
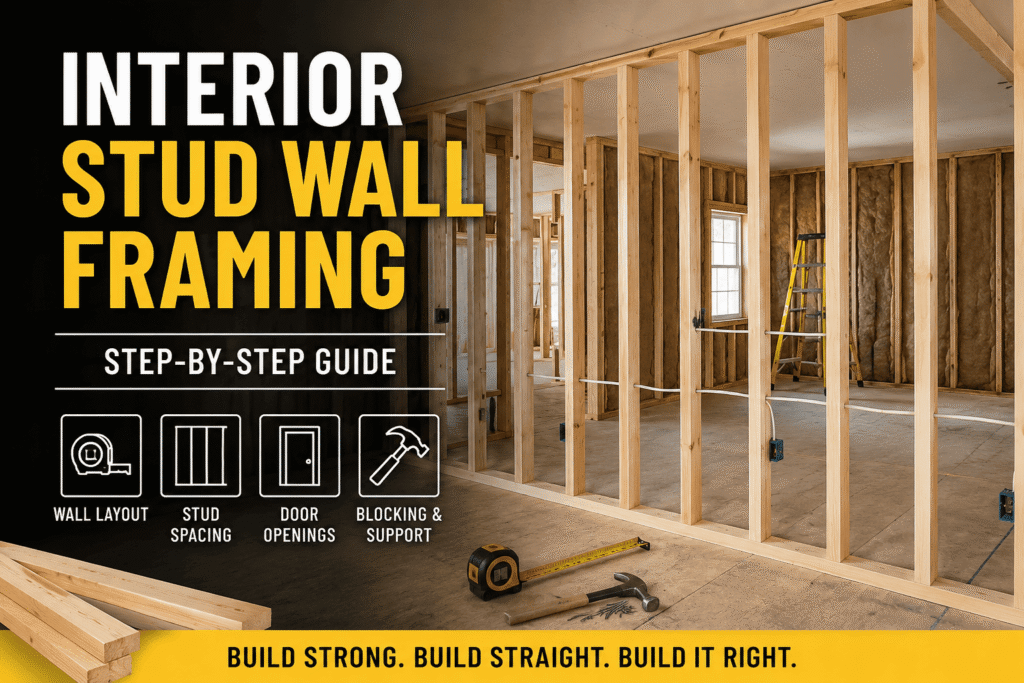
Interior stud wall framing forms the timber framework that divides rooms, supports drywall, and provides space for electrical wiring, insulation, and other building services. A properly framed interior wall should be straight, stable, and carefully planned around doors, cabinets, plumbing fixtures, and electrical components.
For anyone looking for a quick explanation, interior stud wall framing generally involves marking the wall position, cutting and laying out the top and bottom plates, installing vertical studs at the required spacing, framing any door openings, adding blocking, and securing the completed frame to the surrounding structure. The wall should then be checked for level, square, and plumb before insulation, wiring, or drywall installation begins.
Although many interior walls are non-load-bearing, accurate construction still matters. Poor spacing, weak connections, or missing backing can lead to cracked drywall, poorly fitting doors, unstable fixtures, and visible imperfections in the finished wall.
Interior Stud Wall Framing at a Glance
| Framing element | General guidance |
| Common wall type | Non-load-bearing interior partition |
| Common framing material | Nominal 2×4 timber |
| Common stud spacing | 16 inches on centre |
| Main components | Top plate, bottom plate, vertical studs and blocking |
| Door opening | Requires an accurately measured rough opening |
| Fixture support | Additional blocking should be installed before drywall |
| Final checks | Wall should be level, square, plumb and securely fastened |
| Important precaution | Confirm whether the wall is load-bearing before construction or removal |
These are general framing practices rather than universal specifications. Approved construction plans, manufacturer instructions, and applicable local building requirements should always take priority.
What Is an Interior Stud Wall?
An interior stud wall is a framed structure built inside a property to divide one space into separate rooms or functional areas. It commonly forms bedrooms, bathrooms, offices, hallways, closets, and storage spaces.
A typical wood stud partition contains:
- A bottom plate attached to the floor
- A top plate connected to the ceiling structure
- Vertical studs positioned between the plates
- Blocking between studs where additional support is needed
- Extra framing around doors and other openings
- Backing for cabinets, shelves, and wall-mounted fixtures
The framing also creates a cavity where insulation, electrical wiring, and some plumbing services can be installed before the wall is closed with drywall.
Is an Interior Stud Wall Load-Bearing?
An interior stud wall may be load-bearing or non-load-bearing, so its structural purpose must be confirmed before it is built, altered, or removed.
A non-load-bearing partition primarily divides indoor space and supports its own finishes. A load-bearing interior wall transfers weight from floors, roof framing, beams, or other structural components to the supporting structure below.
The two wall types cannot be framed in exactly the same way. A structural wall may require:
- Engineered drawings
- Larger or additional framing members
- Properly sized headers
- Specific fasteners
- Support directly beneath the wall
- Inspection during construction
The position of a wall alone does not confirm whether it is structural. When there is uncertainty, a qualified framing contractor, building professional, or structural engineer should inspect the project before work begins.
What Should Be Checked Before Framing an Interior Wall?
The wall position, structural conditions, door locations, and building services should all be confirmed before framing starts.
The framing team should review:
- Approved floor plans
- Finished room dimensions
- Ceiling height
- Floor and ceiling framing direction
- Door size and swing direction
- Electrical outlets and switches
- Plumbing and ventilation routes
- Cabinet and fixture locations
- Drywall thickness
- Sound-control requirements
- Fire-resistance requirements
Permit requirements should also be reviewed before construction. A basic non-load-bearing partition may be treated differently from a wall associated with a secondary suite, structural alteration, commercial renovation, or fire-rated separation.
Early planning prevents the wall from conflicting with flooring, lighting, pipes, ductwork, ceiling finishes, and future fixtures.
What Lumber and Stud Spacing Are Used for Interior Walls?
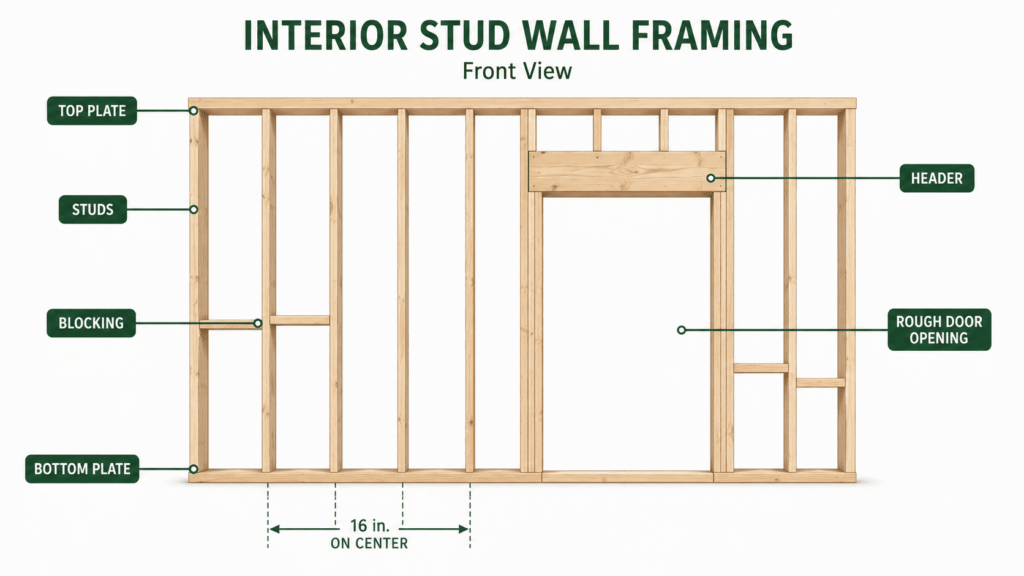
Many residential interior walls use nominal 2×4 lumber with studs positioned 16 inches on center, but the correct arrangement depends on the project design.
The phrase “on center” means that spacing is measured from the center of one stud to the center of the next. Consistent spacing helps drywall edges land securely on framing members.
The appropriate lumber size and wall stud spacing may depend on:
- Wall height
- Structural loads
- Lumber grade
- Drywall thickness
- Fire-rated assembly requirements
- Sound-control design
- Plumbing requirements
- Cabinet and fixture locations
- Applicable building standards
Wider framing may be needed where large plumbing pipes, deeper insulation, or specific structural requirements are involved.
What Tools and Materials Are Needed?
Interior stud wall framing generally requires standard measuring, cutting, and fastening equipment.
Common tools and materials include:
- Framing lumber
- Tape measure
- Carpenter’s pencil
- Chalk line
- Framing square or speed square
- Spirit level or laser level
- Circular saw or mitre saw
- Hammer or framing nailer
- Approved framing nails or structural fasteners
- Drill and driver
- Pry bar
- Clamps
- Safety glasses
- Hearing protection
- Work gloves
The fasteners must suit the framing material and connection type. General-purpose screws and finish nails should not automatically be treated as suitable structural framing fasteners.
How Is an Interior Stud Wall Framed?
An interior stud wall is framed by laying out its exact position, preparing the plates, installing the studs, forming openings, and securing the completed frame to the surrounding structure.
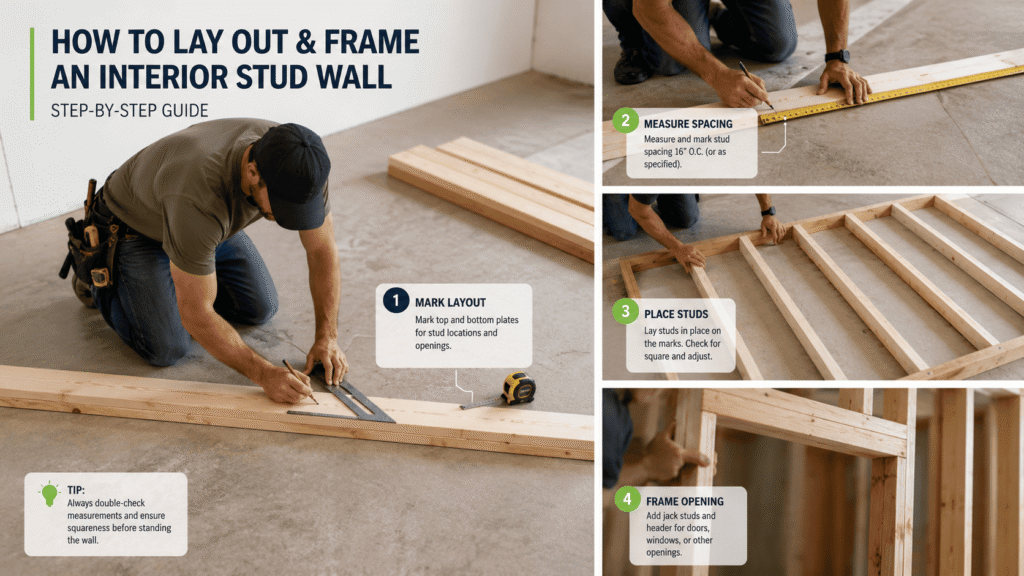
1. Mark the Wall Position
The first step is to mark the exact wall position on the floor.
A chalk line can be used to create a clear reference for the bottom plate. The same position should then be transferred to the ceiling using a laser level, a plumb line,, or an accurate measurement.
The floor and ceiling lines must align. Otherwise, the finished wall may lean or twist.
The wall ends should also be marked on adjoining walls so the framing connects in the correct position.
2. Check the Supporting Structure
The wall should be connected to suitable structural framing rather than only to drywall or decorative finishes.
Before fastening the top and bottom plates, the builder should determine what lies beneath the floor and above the ceiling. When ceiling joists run parallel to the wall, additional backing may be required to provide a secure connection.
The anchoring method may differ depending on whether the floor is:
- Timber
- Concrete
- Subflooring
- Finished flooring
- Part of a heated floor system
Any hidden electrical wiring, plumbing, or heating components should be identified before drilling or fastening.
3. Measure and Cut the Plates
The top and bottom plates should be cut to the required wall length and checked against the marked layout.
They are often positioned side by side so that stud locations can be marked on both plates simultaneously. This keeps the upper and lower layout aligned.
The framing team should also mark:
- Door openings
- Wall intersections
- Corners
- Service routes
- Locations requiring additional backing
4. Mark the Stud Positions
Stud positions should be measured consistently from the selected starting point.
Each layout mark should clearly show which side of the line the stud will occupy. This avoids accidental spacing errors during assembly.
Extra framing may be required at:
- Wall ends
- Corners
- Door openings
- Wall intersections
- Cabinet locations
- Plumbing fixtures
- Drywall joints
- Heavy wall-mounted items
The layout should be checked before any studs are cut or fastened.
5. Frame Door Openings
An interior door opening must be framed according to the required rough-opening dimensions.
The rough opening is normally wider and taller than the finished door because space is needed for the door frame, adjustment, and installation.
Depending on the wall design, door framing may include:
- Full-height studs
- Supporting studs
- A horizontal header
- Short studs above the opening
A non-load-bearing doorway may use a different header arrangement from a structural opening. The approved plans and door manufacturer’s dimensions should guide the final construction.
An inaccurate or uneven rough opening can cause the door to bind, swing incorrectly, or leave inconsistent gaps after installation.
6. Cut and Install the Vertical Studs
Vertical studs should be measured carefully because floors and ceilings are not always perfectly level.
The ceiling height should be checked at multiple points before cutting all the studs to the same length. Each piece should also be inspected for:
- Bowing
- Twisting
- Splitting
- Excessive warping
- Other visible damage
Studs with a slight crown should face in a consistent direction where practical. This produces a flatter framing surface for drywall.
The studs are then positioned on their layout marks and securely fastened to the top and bottom plates.
7. Assemble or Frame the Wall in Place
An interior partition may be assembled flat on the floor and raised into position, or framed directly in place.
Building the wall flat can make measuring and fastening easier, but it requires enough floor space and ceiling clearance to lift the completed frame.
Framing in place is often more practical in:
- Basements
- Renovation projects
- Confined rooms
- Areas with finished ceilings
- Spaces containing existing services
Whichever approach is used, the wall must remain aligned with the original floor and ceiling marks.
8. Add Blocking and Fixture Backing
Blocking should be added anywhere the finished wall will need extra support.
Typical locations include:
- Kitchen cabinets
- Bathroom vanities
- Grab bars
- Handrails
- Wall-mounted televisions
- Shelving
- Heavy mirrors
- Curtain hardware
- Interior trim
- Drywall edges
Installing backing while the framing remains open is easier and more reliable than opening the finished wall later.
Blocking may also be required for structural restraint, fire stopping, or tall-wall support. These requirements depend on the approved wall assembly.
9. Secure and Check the Wall
The completed frame should be secured to the floor, ceiling, and adjoining walls before other building work begins.
The framing team should confirm that:
- The bottom plate follows the marked layout.
- The wall is vertical from end to end.
- Stud faces create an even plane.
- Door openings are square.
- The top plate is properly supported.
- All required fasteners are installed.
- The wall is firmly connected.
- No stud is severely bowed or twisted.
Corrections should be made before wiring, insulation, or drywall conceals the framing.
How Are Electrical Wiring and Plumbing Added to a Stud Wall?
Electrical wiring and small plumbing services are commonly routed through approved openings in the wall studs.
Service holes should be carefully planned rather than drilled randomly. Poorly positioned or oversized openings can weaken framing members and increase the risk of later damage.
Protective metal plates may be required where wires or pipes pass close to the face of a stud. These plates help prevent drywall screws or nails from penetrating hidden services.
Electrical, plumbing, and mechanical work should be completed by qualified trades where licensed or permitted work is required.
How Can an Interior Stud Wall Be Soundproofed?
An interior stud wall can be made quieter by combining cavity insulation, sealed gaps, and sound-reducing materials.
Common sound-control improvements include:
- Acoustic insulation between studs
- Additional drywall layers
- Resilient channels or isolation systems
- Acoustic sealant around the wall perimeter
- Sealing around outlets and other penetrations
- Staggered or separated stud arrangements
- Solid-core doors with sealed frames
Insulation alone may reduce some airborne noise, but it does not create a complete soundproof wall. Noise can still travel through studs, doors, ceilings, floors, and unsealed openings.
Bedrooms, bathrooms, home offices, laundry rooms, and mechanical spaces often benefit from additional acoustic planning.
When Are Fire Blocking and Fire-Rated Walls Required?
Fire blocking or a fire-rated wall assembly may be required where the wall forms part of a regulated separation or contains concealed cavities.
These requirements are particularly important in:
- Secondary suites
- Multi-unit buildings
- Garages
- Commercial spaces
- Walls separating different occupancies
- Certain tall or concealed wall cavities
A fire-rated wall is a completely tested assembly. Its performance may depend on stud size, spacing, insulation, drywall type, number of drywall layers, fasteners, and joint treatment.
Changing one component can affect the performance of the entire assembly. Project plans and current building requirements should therefore be followed exactly.
What Are the Most Common Interior Wall Framing Mistakes?
The most common framing mistakes involve incorrect layout, weak connections, missing backing, and failure to verify whether the wall is structural.
Assuming Every Interior Wall Is Non-Load-Bearing
An interior location does not prove that a wall is non-structural. Its purpose should be verified before alteration or removal.
Using Uneven Stud Spacing
Inconsistent spacing can leave drywall edges unsupported and make installation more difficult.
Fastening Only to Drywall
The top and side connections should reach appropriate structural framing or approved backing.
Incorrectly Framing Door Openings
A rough opening that is too small, too large, or out of square can cause installation and operation problems.
Forgetting Fixture Backing
Cabinets, grab bars, shelves, and other heavy fixtures require solid attachment points inside the wall.
Ignoring Plumbing and Electrical Routes
Poor planning can result in unnecessary drilling, damaged studs, and conflicts between different trades.
Skipping the Final Alignment Check
A wall should be checked for level, square, and plumb before drywall is installed. Small framing errors become more visible once doors, trim, and cabinets are added.
When Should a Professional Framing Contractor Be Hired?
Professional framing support is recommended when the project involves structural uncertainty, regulated wall assemblies, or complicated coordination with other building systems.
A framing contractor should be considered for:
- Possible load-bearing walls
- Structural headers or beams
- Fire-rated separations
- Secondary suites
- Commercial renovations
- Tall or unusually shaped walls
- Complex door openings
- Major layout changes
- Permit-controlled construction
- Walls containing several building services
An experienced contractor can interpret project drawings, coordinate with other trades, and identify framing problems before they affect later construction stages.
Plan Interior Stud Wall Framing Carefully
Interior stud wall framing is more than placing timber at regular intervals. A successful wall must work with the building structure, room layout, door openings, electrical services, plumbing, drywall, and future fixtures.
Accurate layout, consistent stud spacing, secure connections, and planned backing create a straighter wall that is easier to finish and more reliable over time.
For residential and commercial framing projects in Calgary and surrounding Alberta communities, Woodzio Framing can provide professional framing support in accordance with approved construction plans, project requirements, and applicable building standards.
Frequently Asked Questions
How far apart should interior wall studs be?
Interior wall studs are commonly positioned 16 inches on center, although the required spacing depends on wall height, materials, structural design, and applicable building requirements.
Are interior walls usually framed with 2×4 lumber?
Many residential interior partitions use nominal 2×4 lumber. Wider framing may be required for structural loads, plumbing, soundproofing, or specific wall assemblies.
Should insulation be added to an interior stud wall?
Interior insulation is commonly added for sound control, privacy, or temperature separation. It may also be required as part of a tested fire-rated or acoustic wall assembly.
Can an interior stud wall be built over finished flooring?
It may be possible in certain situations, but the correct method depends on the flooring material, anchoring system, and project design. Permanent walls must be properly connected to the supporting structure.
Can electrical cables pass through wall studs?
Electrical cables are commonly routed through approved holes in wall studs. The positions and sizes of the holes, protective plates, and electrical installations must comply with applicable requirements.